Item Added To Your Cart
You are all set.We've reserved it just for you
Your cart is currently empty.
You are all set.We've reserved it just for you
Your cart is currently empty.

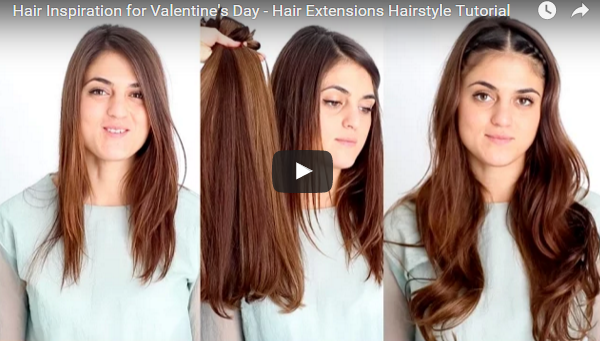
Need a cute Valentine’s Day hairstyle to rock this weekend? We’ve got the perfect look for you!
Start by parting your hair in the middle and creating two smaller sections at the front (one on each side). Braid the two sections of hair. We did two basic braids. But you can, of course, do any type of braid you wish for. If braiding simply isn’t for you, try twisting the hair instead. Once you’re done braiding or twisting the hair, secure the hair using clear elastic bands. We also used a volumizing foam from Redken to help add texture to the hair. This is great if your hair feels too slippery. An alternative to this is using texturizing spray.
Move one to adding your clip-in hair extensions at the back of your hair, but make sure to leave a bit of hair at the top (we’ll work on this section of hair later on). To achieve this cute Valentine’s Day hairdo, we used clip-ins from the Classic 20” set. We added 3 clip ins at the back of the head for more volume and a bit of added length. However, if you want more volume, go ahead and add even more clip ins. If you’re going for a more subtle look, you can add less clip ins or none at all. You decide what feels best for you.
Brush through the hair to help the clip in hair extensions better blend with your hair and then move on to styling the hair. We used a 1.5 inch curling wand when curling the models hair. To make your curls last, make sure to let the hair cool down and set before styling it. Use clips or pins to hold each curl in place while it cools down. An alternative is to hold each curl in your hand a few seconds before releasing it.
While letting the curled hair cool down, bring your two side braids or twists to the back of the hair and secure with an elastic band. Now it’s time to work on the top section of hair. Let down a section of hair and add clip ins. Bring down another section of hair from the top and add another clip in piece. We added 2 pieces of clip in hair extensions at the top of the head. Again, you decide how many clip ins you’d like to add for your desired look.
Once the last clip ins are in, it’s time to curl the rest of the hair. Let the hair cool down before brushing through all of your hair. Gently go through the hair using your fingers and Voila! You’re done!
We hope you’ll give this hairstyle a try during the weekend. And if you do, don’t forget to share your look with us on Instagram using #estellessecret. We’d love to see you recreate this hairdo!
Wishing you a lovely weekend!
ES Team
It’s super long, super high, and super thick. It also happens to be the signature style for a top celebrity that for most people...
Selena Gomez has some of the most gorgeous celebrity hair! It’s so thick, shiny, and always slaying the hair game. One of her...
Kim Kardashian’s hair gives most of us ladies some serious hair envy. It is always on point! Whether she wears it straight, i...
Braided in the front, curls in the back—this is a classic romantic look! You can achieve it with a little bit of patience and...
COMBINED FISHTAIL BRAID So, if you’ve never done a fishtail braid before, it can be a little intimidating but after you finis...
Let me just tell you, you are about to get some serious cool points from your friends for this professional looking braid. Not ...
So, someone’s getting married, and you want to look your bridal best. If you’re looking for the perfect wedding up-do, we�...
Even though this is a fall-inspired style, this ponytail is stylish enough to wear any season, any day, and for any occasion! B...
Fall is a time for change. Leaves changing colors, tank tops to hoodies, iced lattes to pumpkin spiced, you get the idea! It’...
Ok, I get it! Sometimes curling your own hair can take up enough time without having to worry about curling your hair extensions t...
If you have gorgeous, thick and voluminous hair, this tutorial is not for you, lol! Let’s face it, not all of us were blessed...
You don’t have to wait six months to have long hair! If you’ve been trying to grow your hair it out a while, but you’re r...
Have you ever instantly regretted a do-it-yourself hair color treatment—especially going from dark to light? Maybe that sandy...
At one point, half-up styles took a back seat when it came to hairstyles but lately they have been super trendy and super hot! Par...
Real talk ladies, we’ve all been there! You wake up late, you throw on some clothes, and look in the mirror and think “what...
Just when you thought we were running out of tutorial ideas, BAM! We got six new styles to show you guys! SIX! As always, all o...
Sometimes it’s easy to forget but I am here to remind you that within each of you lies a goddess. A goddess that is uniquely ...
Let’s take a trip down memory lane and remember all the glory of the 1960’s. True, it did have some pretty conflicted event...
Hello, ladies, I am back with this popular go-to style that takes about 3 minutes and can be worn in many different ways from a...
Hey, lovelies! So, I definitely don’t indulge in celebrity related events and award shows but I do look at them every here an...
Every now and again, I get caught up with work or family and fail to even realize how completely boring my hair routine has got...
Have you ever done the fry-and-chop? Your friend had some flirty summer highlights, and you wanted to try them for yourself. Yo...
We all know it takes (seemingly) FOREVER to grow hair out. Maybe you wanted a drastic change, so you chopped it all off. And wh...
Want to volumize and lengthen your hair? Try hair extensions! You can make it happen in under an hour, and we’re going to sho...
Overwhelmed by the idea of trying hair extensions for the first time? Don’t be afraid—volume can be yours in less than an h...
Are you guys ready for some great new hairstyles to show off? I hope so because I have three unique options for you to learn th...
Blispay makes shopping at Estelle's Secret even easier. It's the only payment option that gives you:
No Payments, No Interest on purchases over $199 if paid in full in 6 months.
Blispay gives you 2% Cash Back on all purchases and works everywhere Visa is accepted.
APPLY NOW AT BLISPAY.COM