Item Added To Your Cart
You are all set.We've reserved it just for you
Your cart is currently empty.
You are all set.We've reserved it just for you
Your cart is currently empty.
Now, you can get one of many half-up styles using Estelle’s Secret hair extensions. Check out this fun and creative style that offers the best of both hair worlds!
At one point, half-up styles took a back seat when it came to hairstyles but lately they have been super trendy and super hot! Part of this rising interest in half-up styles is thanks to the beautiful Duchess of Cambridge, Kate Middleton. As the number one beauty icon in the UK and a half-up style fan, it’s no wonder the style has made a big comeback. Now, you can get one of many half-up styles using Estelle’s Secret hair extensions. Check out this fun and creative style that offers the best of both hair worlds!
Let’s work with the back half first so go ahead and put the sides and the top half into an elastic band or clip to keep them out of the way.
* You will be using a combination of clips for this section.
Ok, start by making a part at the bottom leaving out about an inch of your natural hair.
Add your first clip which will be a two clip piece.
*I recommend brushing between each layer to help blend your extensions with your natural hair and to keep the hair nice and neat.

Add another layer of your natural hair.
Now, add a three clip piece, then another ½-1 inch of your natural hair.
Time for a four clip piece! After this, you will again add another layer of your own hair.
The next and final clip you will use for this section is another three clip piece.
* OPTIONAL: You are welcome to add more clips if needed.

Simply brush all of the hair together for a smooth and blended look.
So, go ahead and clip away the back area you just finished to keep it out of the way while you work on the front.
Let down the top section of hair and figure out where you want your ponytail positioned. Using an elastic band make a little ponytail in the spot you decided on.
* Make sure you leave plenty of your own hair around all areas of the ponytail for a seamless look.

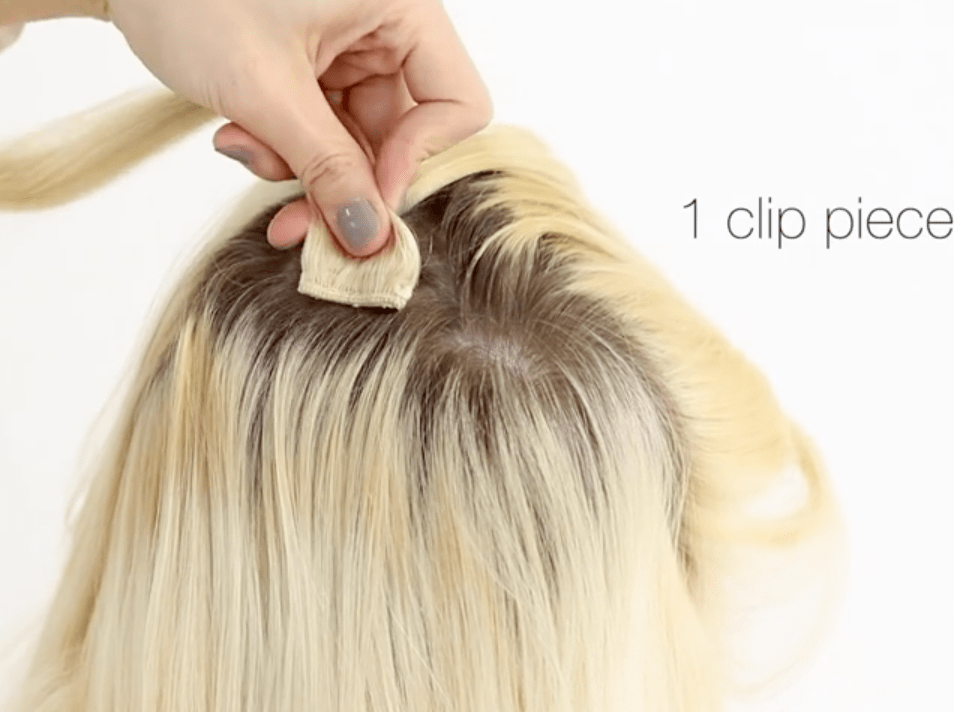
Let’s apply a one clip piece right in front of the elastic band and another one clip piece inside out on the back of the little ponytail.

Add a circle of your natural hair around the clips.
Brush the hair into the ponytail and secure with another elastic band for a slightly bigger ponytail.
Add a two clip piece to the front of your ponytail.
Next, brush up the remainder of your loose hair and secure it with an elastic band.
* OPTIONAL: For an even thicker ponytail use a four clip piece and clip it tightly around the ponytail. Hide the weft by taking out a small section of the ponytail hair, braiding it, and wrapping it around the weft of your ponytail. Of course, secure the end with a hairpin.

Ok, start by pinning your hair out of the way, leaving maybe about a 3-4 inch section at the bottom.
So, using your curling wand, curl medium wide sections of your hair and try to curl all of your hair horizontally and in the same direction for the best results!
*Also, for this style, release the curls into your hand and allow to cool down before releasing them.

Are you done with the back section? Great! Now it’s time to move on to curling the ponytail. You’re going to do the same thing as before curling horizontally and allowing the curls to cool in your hand. Perfect!

Ok, now just give your curls a couple of minutes to cool down and set.
Brush your hair out all over to create big, soft waves.
* Style Tip: Tease the hair at the base of your ponytail to create more volume!
Some people don’t realize all the possibilities you have when you use clip-in hair extensions. I hope this tutorial showed you guys just how creative you can really get, the possibilities are endless! Be sure to subscribe to Estelle’s Secret to learn even more creative and stylish looks.
It’s super long, super high, and super thick. It also happens to be the signature style for a top celebrity that for most people...
3 Comments
Read MoreSelena Gomez has some of the most gorgeous celebrity hair! It’s so thick, shiny, and always slaying the hair game. One of her...
4 Comments
Read MoreKim Kardashian’s hair gives most of us ladies some serious hair envy. It is always on point! Whether she wears it straight, i...
Braided in the front, curls in the back—this is a classic romantic look! You can achieve it with a little bit of patience and...
COMBINED FISHTAIL BRAID So, if you’ve never done a fishtail braid before, it can be a little intimidating but after you finis...
3 Comments
Read MoreLet me just tell you, you are about to get some serious cool points from your friends for this professional looking braid. Not ...
1 Comments
Read MoreSo, someone’s getting married, and you want to look your bridal best. If you’re looking for the perfect wedding up-do, we�...
1 Comments
Read MoreEven though this is a fall-inspired style, this ponytail is stylish enough to wear any season, any day, and for any occasion! B...
Fall is a time for change. Leaves changing colors, tank tops to hoodies, iced lattes to pumpkin spiced, you get the idea! It’...
Ok, I get it! Sometimes curling your own hair can take up enough time without having to worry about curling your hair extensions t...
If you have gorgeous, thick and voluminous hair, this tutorial is not for you, lol! Let’s face it, not all of us were blessed...
1 Comments
Read MoreYou don’t have to wait six months to have long hair! If you’ve been trying to grow your hair it out a while, but you’re r...
Have you ever instantly regretted a do-it-yourself hair color treatment—especially going from dark to light? Maybe that sandy...
At one point, half-up styles took a back seat when it came to hairstyles but lately they have been super trendy and super hot! Par...
2 Comments
Read MoreReal talk ladies, we’ve all been there! You wake up late, you throw on some clothes, and look in the mirror and think “what...
1 Comments
Read MoreJust when you thought we were running out of tutorial ideas, BAM! We got six new styles to show you guys! SIX! As always, all o...
Sometimes it’s easy to forget but I am here to remind you that within each of you lies a goddess. A goddess that is uniquely ...
3 Comments
Read MoreLet’s take a trip down memory lane and remember all the glory of the 1960’s. True, it did have some pretty conflicted event...
4 Comments
Read MoreHello, ladies, I am back with this popular go-to style that takes about 3 minutes and can be worn in many different ways from a...
Hey, lovelies! So, I definitely don’t indulge in celebrity related events and award shows but I do look at them every here an...
1 Comments
Read MoreEvery now and again, I get caught up with work or family and fail to even realize how completely boring my hair routine has got...
1 Comments
Read MoreHave you ever done the fry-and-chop? Your friend had some flirty summer highlights, and you wanted to try them for yourself. Yo...
1 Comments
Read MoreWe all know it takes (seemingly) FOREVER to grow hair out. Maybe you wanted a drastic change, so you chopped it all off. And wh...
Want to volumize and lengthen your hair? Try hair extensions! You can make it happen in under an hour, and we’re going to sho...
Overwhelmed by the idea of trying hair extensions for the first time? Don’t be afraid—volume can be yours in less than an h...
Are you guys ready for some great new hairstyles to show off? I hope so because I have three unique options for you to learn th...
4 Comments
Read MoreBlispay makes shopping at Estelle's Secret even easier. It's the only payment option that gives you:
No Payments, No Interest on purchases over $199 if paid in full in 6 months.
Blispay gives you 2% Cash Back on all purchases and works everywhere Visa is accepted.
APPLY NOW AT BLISPAY.COM